

Got a boring dresser that’s seen better days? Sometimes vintage furniture pieces have great bones but lack personality. They sit there, plain and forgettable.
The good news is that no expert woodworking skills are required to give tired furniture a serious glow-up. With the right technique and a little creativity, any flat, uninspiring piece can be transformed into something that truly stands out.
Supplies You’ll Need
This project doesn’t require costly tools or multiple store runs. Most supplies are basic and may already be available at home.
Essential supplies:
- Durham’s Rock Hard Putty (the star of the show)
- Water for mixing
- Stencil of your choice
- Painter’s tape or washi tape
- Plastic paint scraper or putty knife
- Mixing bowl
- Measuring spoon
- Popsicle sticks for stirring
- Sandpaper (preferably medium-grit)
- Paint and brushes
Pro Tip: Dedicate an old tablespoon from a thrift store for mixing putty. It prevents damage to everyday silverware.
Stencil choice depends on the desired style. Geometric patterns often create a modern effect, while floral designs feel more traditional. The stencil size should match the furniture surface—oversized designs can overwhelm small drawer fronts.
Keep wet paper towels handy. Durham’s putty dries rock hard, so spills need to be cleaned immediately.
1. Sand and Dust the Furniture
Before you get excited about the fun stuff, you need to prep your piece properly. Sand down any rough spots or old finish that might interfere with adhesion. You don’t need to strip it completely, though, just scuff it up enough so the putty has something to grip.
Medium-grit sandpaper works well. Focus on areas where the stencil design will be applied. Once sanding is complete, wipe down the entire surface with a clean cloth. Even small amounts of dust can prevent proper adhesion.
2. Attach the Stencil
Drawer fronts can make stencil work tricky since edges encourage curling. Position the stencil carefully where the design is desired, then secure it with painter’s tape.
For extra stability, extend the tape around the sides of the drawer. This trick prevents movement and reduces the risk of putty seeping underneath. Patience is key here—clean placement ensures a clean design.
Heads Up: Take your time with this step. Being patient will pay off since a wonky stencil means a wonky design.
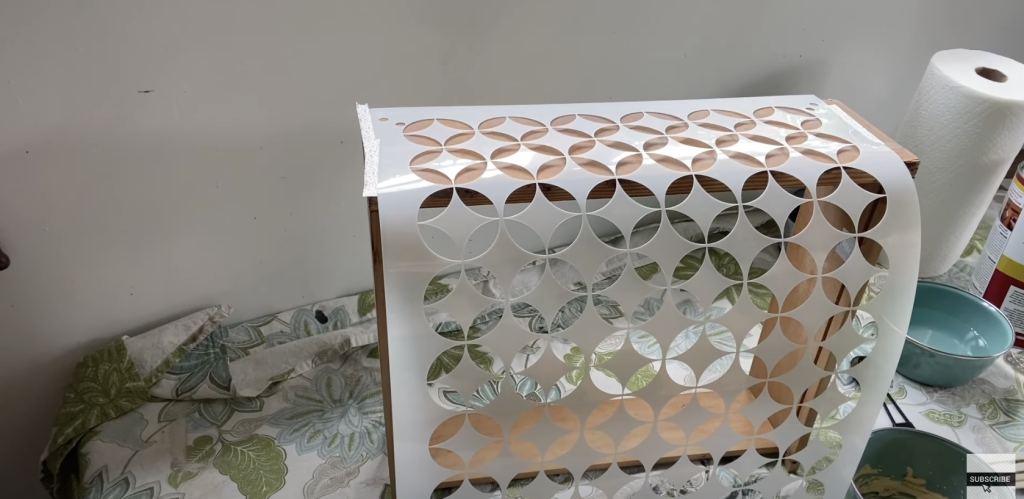
Image credit: My Creative Days YouTube Channel
3. Mix Durham’s Water Putty
Time for some DIY chemistry. Durham’s uses a 3:1 ratio — three parts putty powder to one part water. For example, a single, small dresser drawer will need a mixture of three tablespoons of putty and one tablespoon of water. Bigger projects or stencils will require bigger batches.
With that out of the way, grab a plastic bowl, measure your putty powder first, and then gradually add the water. Stir with a popsicle stick or a wooden spoon. Keep mixing until you get a consistency similar to peanut butter.
Note: Go slow and make sure you scrape down the sides to get all the powder. You can always add more water later, but you can’t remove it. You know you’re done when the mixture holds together without being runny or crumbly.
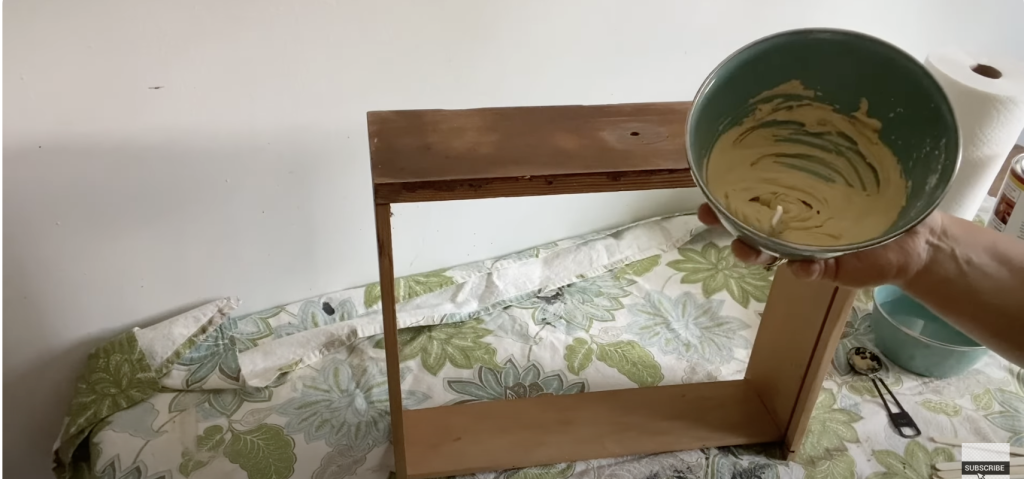
Image credit: My Creative Days YouTube Channel
4. Apply Putty to the Stencil Openings
Now comes the satisfying part:
Grab your plastic paint scraper or putty knife and scoop up some putty mixture. Hold the stencil firmly with one hand and spread the putty over the openings with the scraper.
You’re not frosting a cake here. Think more like spackling a wall. In other words, apply gentle, even pressure as you work across the stencil.
Remember that the goal here is to fill every opening without creating massive globs. You’ll just be creating extra work for yourself later, and no one wants that.
Additionally, make sure you’re pushing the putty into all the details of your design, especially if you chose an intricate pattern.
Keep an eye on your stencil edges as well. Sometimes, putty likes to sneak underneath, which creates messy lines. If you notice this happening, clean it up as you go with a damp cloth.
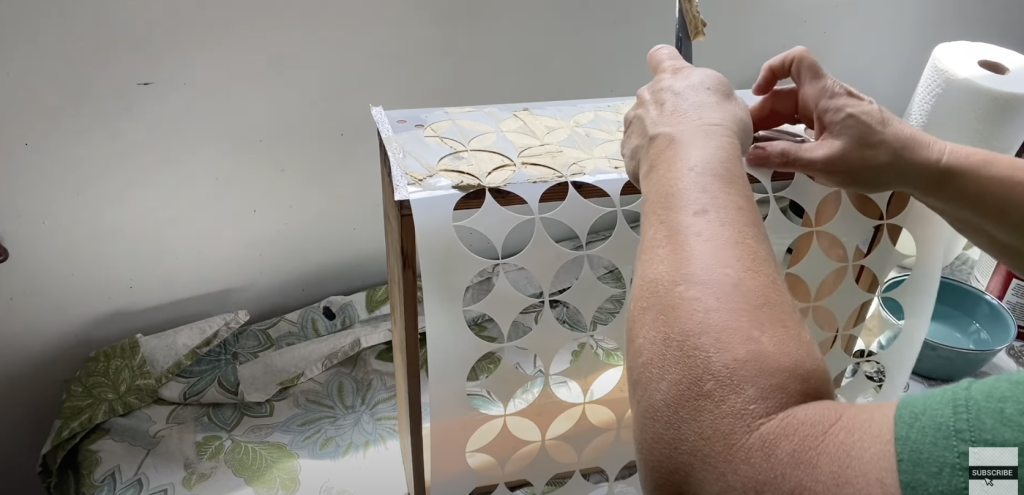
Image credit: My Creative Days YouTube Channel
5. Remove Excess Putty
Next, let’s channel your inner perfectionist. Use your scraper to gently remove excess putty from the surface, leaving just enough to create the raised design you want.
Think of this like using a squeegee on a window. Simply hold the scraper at a slight angle and pull it across the stencil surface. Doing this removes the bulk of the excess while keeping putty in the design openings where it belongs.
Don’t stress about getting this step absolutely right. You’ll have a chance to sand any stubborn areas later. But the cleaner you get it now, the less work you’ll have down the road.
Heads Up: If you’re working on a large piece, work in sections. Durham’s putty stays workable for a reasonable amount of time, so you don’t need to rush.
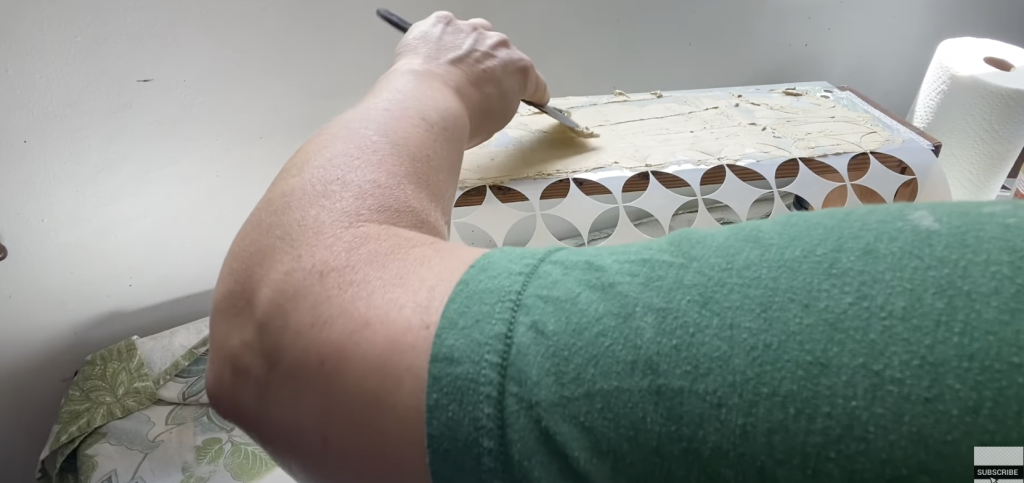
Image credit: My Creative Days YouTube Channel
6. Lift the Stencil
Moment of truth; it’s time to carefully peel away your stencil to reveal the raised design underneath. Be sure to start from one corner and work slowly, since yanking it off quickly can disturb your freshly applied putty.
Don’t panic if some areas look a bit rough or if there are small imperfections. That’s totally normal and exactly why sandpaper exists. The important thing is that you can see your design taking shape.
Unfortunately, despite all precautions, some putty might still extend along the bottom edges of the drawer. Leave it alone for now. It’s much easier to remove once it’s dry. Dried putty breaks away pretty easily with gentle scraping or sanding.

Image credit: My Creative Days YouTube Channel
7. Clean the Stencil
Here’s your PSA: Never, ever rinse putty down your drain. This stuff lives up to its “rock hard” name and will create plumbing nightmares you don’t want to deal with.
Instead, if the weather outside allows for it, hose down your stencil on your porch or in the yard. If the weather isn’t that great or you don’t have a hose, use wet paper towels to wipe away the putty residue. Throw them in the trash afterward. Don’t flush them or try to rinse them clean.
In case you only bought one stencil and are doing multiple drawers or furniture pieces, make sure to clean it between uses. Dried putty makes stencils harder to position properly and can create an uneven texture to the piece.
Since you’re likely keeping the stencil for future DIY projects, store it flat so it doesn’t warp. A warped stencil is a useless stencil.
8. Allow the Putty to Fully Dry
Durham’s Rock Hard Putty needs time to cure properly, and rushing this step will mess up all your hard work.
That said, drying time depends on how thick you applied the putty and your local humidity levels. Generally, give it at least 6 to 24 hours before you even think about touching it. When the time’s up, the putty should feel completely solid and cool to the touch.
Resist the temptation to try to speed up the process with heat guns or hair dryers. Let chemistry do its thing naturally. If you must keep busy, use this time to clean your tools, plan your paint colors, or work on other furniture pieces.
Heads Up: The putty will lighten in color as it dries, so don’t worry if it looks darker than expected initially.
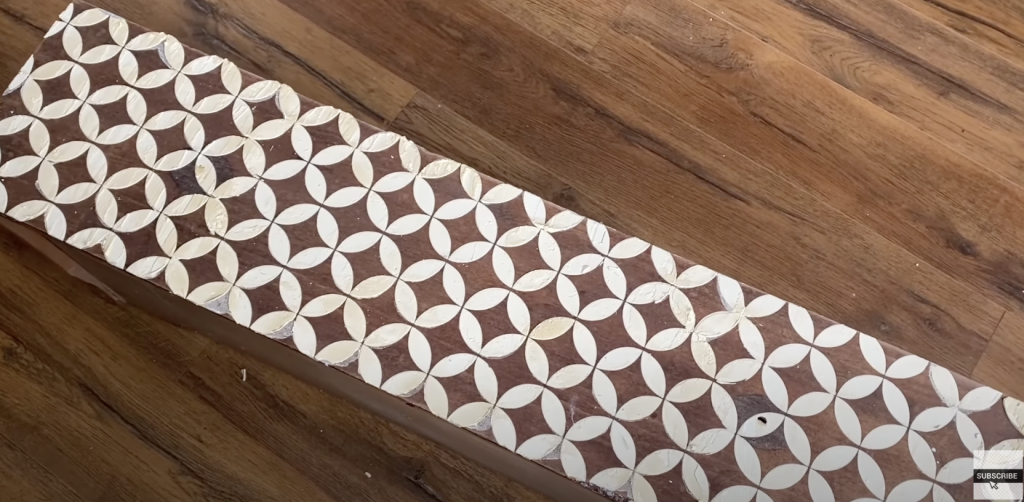
Image credit: My Creative Days YouTube Channel
9. Sand the Surface to Remove Excess Putty
Once your putty is completely dry, it’s time to refine your masterpiece. Use more medium-grit sandpaper to smooth out any rough edges or areas where you applied too much putty.
You want to focus on the areas around your design rather than the raised portions themselves. You also need to keep the texture while cleaning up the surrounding surface. So, sand lightly as you go since you’re not trying to remove the design, just perfect it.
Work in good light so you can see what you’re doing. It’s easy to oversand in dim conditions and lose some of your beautiful handiwork.
Once done, wipe away all sanding dust with a clean cloth before moving on to painting the furniture. Note that dust and fresh paint create a gritty finish that looks messy and amateur.
10. Apply Thin Coats Of Paint
The final step. You get to bring everything together by painting over your hard work.
Pro Tip: Don’t know what paint to use yet? Easy. Simply choose a paint that complements your design style. Bold colors, for instance, make the texture pop, while neutral tones create a subtle, sophisticated look. There’s no wrong choice, really, just different styles.
Either way, the keyword here is “thin.” Thick paint coats will fill in your carefully created texture and defeat the whole purpose of this project. Instead, apply paint in light, even strokes, building up coverage gradually.
You also want to pay special attention to the raised areas of your design. Paint can pool in the crevices between raised sections, creating an uneven finish. As such, use a brush or roller with light pressure to avoid forcing paint into these areas.
Additionally, two or three thin coats usually provide better coverage and durability than one thick coat. Remember to let each coat dry completely before applying the next one. Rush this step and you’ll get brush marks, drips, or uneven coverage.
Another pro tip: Use an all-in-one paint with primer and topcoat included to save myself the headache. If you use a similar product, you’ll need fewer coats. Still, apply them thinly for the best results.
Finally, make sure to step back periodically to check your progress. Sometimes it’s easier to spot missed areas or uneven coverage from a distance.

Image credit: My Creative Days YouTube Channel
Wrapping Up
And there you have it! This textured furniture makeover follows a simple stencil technique to help you add whatever raised designs to your drawers’ fronts. Just remember the secret weapon: Durham’s Rock Hard Water Putty.
The best part about this guide? You can follow it to breathe life into more than just dressers, but also nightstands, cabinet doors, and pretty much any flat furniture surface. No fancy tools required, and you definitely don’t need years of experience either.


